ePortfolio
ePortfolio is a personal portfolio tool for storing, organizing, reflecting on, and sharing items that represent your learning. You can include documents, graphics, audio files, videos, presentations, course work, and more to demonstrate your improvement or mastery in certain areas.
You have control over what items you want to include in your portfolio, how you want to organize them, and who you want to share them with. When you share items with your peers, mentors, or potential employers, for example, you can give them permission to view items, edit items, see or add comments, and see or add assessments to get the feedback that you want.
You can also download ePortfolio mobile application for iOS devices. See ePortfolio Mobile Application [1] for more information about using this application (available in English only).
Learner Topics
What are the main pages of ePortfolio?
- The Dashboard [2]
- My Items page [3]
- The Explore page [4]
What are artifact types I can add to my ePortfolio? How can I add them?
- Linked web addresses [7]
- Uploaded files [8]
- Web document [9]
- Audio recordings [10]
- Form responses [11]
- Course content [12]
- Learning objectives [13]
- ePortfolio Mobile Application [1]
How do I use reflections in my course?
- Add reflections [14]
How do I create and edit presentations?
- Add new presentations [16]
- Add items to presentations [17]
- Copy presentations [18]
- Edit display options [19]
- Modify the layout [20]
- Change the theme [21]
- Set banner text [22]
- Customize page navigation [23]
How do I create collections?
What are the assessment types in ePortfolio?
- Dropbox submissions [28]
What are the basic concepts in sharing items?
How do I import and export ePortfolio items?
- Import items [38]
- Export items [39]
Audience:
- Learner [42]
Understanding the main pages of ePortfolio
Audience:
- Learner [42]
Understanding the Dashboard
The Dashboard is the main landing page for ePortfolio. To return to your Dashboard from another ePortfolio page, click ePortfolio from the tool navigation.
From the Dashboard page, you can add new content to your ePortfolio, review recent activity on your items and items shared with you, and check invites from your peers.
Adding new content
You can add new content to your ePortfolio using the options available in the Build your ePortfolio area or add reflections, file and link artifacts in the "What are you learning?" panel.
"What are you learning?" panel
The "What are you learning?" panel above the newsfeed prompts you to record brief thoughts about a current learning experience which you can expand upon at a later date. You can also add file artifacts or a link artifact to your ePortfolio or associate them with your brief reflection.
When you post an item, it automatically shares with the default sharing group you specified in your ePortfolio settings [6].
Note If reflection or artifact posts do not appear in your newsfeed, select Include modifications I make on my items in my newsfeed in your ePortfolio settings [6].
Using the newsfeed
The newsfeed consolidates recent activity on your items and items shared with you, providing a quick way to return to active projects. Your items appear in this area if they have been recently edited, commented on, or assessed. If you contribute a comment, an edit, or an assessment to another user's item, that item also appears in the newsfeed and you can seecontributions others are making to it.
Filters at the top of the newsfeed enable you to search and view specific sets of content; you can filter recent activity by ownership (yours versus others' items), people and items you've subscribed to, and items from contacts in the Pager tool (Friends List).
Checking your invites
The Unread Invites area displays your recent invites, including the author of the invite, the message content, and the associated ePortfolio item.
See Viewing items shared with you [29] for more information about Invites.
Check your invites
View the Unread Invites area of your Dashboard for recent invites or click View invites page for past invites.
See also
Audience:
- Learner [42]
Understanding the Explore page
The Explore page consolidates items others have shared with you or publicly into one view. Others' shared ePortfolio items display in a list that you can sort by name or date modified, ascending or descending. Filters at the top of the list enable you to view content by item type.
From the Explore page you can:
- Browse items and depending on your sharing permissions, view and leave comments and assessments, and edit others' items.
- Click on a user's name to view all content shared from that user.
- Subscribe to an item or a user.
- Use the search field to find content. The search checks for matches within item titles, tags, descriptions, and owner names.
If you have permission to view comments or assessments on an item, the feedback activity icon [43] appears beside items when there is comment and assessment activity.
Audience:
- Learner [42]
Understanding the My Items page
My Items consolidates all of your artifacts, reflections, presentations, collections, and learning objectives into a single view, enabling you to view, search, and manage all of your content from one location. On the My Items page you can:
- Add ePortfolio content by clicking New Presentation, New Collection, or the Add button
- Bulk add items to a presentation or collection or bulk associate items with learning objectives from the More Actions button
- Perform common actions on your ePortfolio items, such as view, preview (image and HTML file artifacts only), edit, copy (presentations only), delete, and share
Your ePortfolio items display in a list that you can sort by name or date modified, ascending or descending. Filters at the top of the list enable you to search and manage specific sets of content; you can filter by item type or sharing status.
Activity icons
Once you share items with others and they provide comments or rubric assessments, icons that represent this activity appear beside your items in the My Items listing.
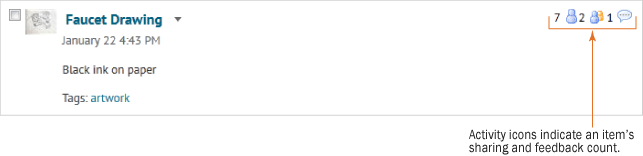
An image artifact from the My Items listing
You can click on these icons to view details about which individuals or groups you are sharing an item with or review comments and rubric assessments made on that item.
Clicking on the sharing group icon or individual icon opens an item's Sharing Settings dialog. From here you can modify who can access your item. Clicking on the feedback icon opens an item's View page where you can review comments and rubric assessments from others.
Audience:
- Learner [42]
Accessing the Import and Export tool
-
Click
 ePortfolio on the navbar or from the My Settings widget.
- On the My Items page, click Go to Import/Export page from the More Actions button.
Audience:
- Learner [42]
Understanding ePortfolio settings
Settings allow you change display options and preferences for your ePortfolio. Click ![]() Settings on the Dashboard, My Items, Explore, or Sharing Groups page to access these preferences.
Settings on the Dashboard, My Items, Explore, or Sharing Groups page to access these preferences.
| Setting | Description |
|---|---|
| Display Options | |
|
Default list size |
Select the number of items to display in your newsfeed, My Items, and Explore lists. |
|
Number of activities on newsfeed items |
Select the maximum number of events you want to display in each newsfeed item. |
|
My Modifications |
Choose whether to include activity you make on your own items to your newsfeed. |
|
Number of unread invites on dashboard |
Select how many unread invites appear on your Dashboard. |
|
Date Range |
Select how many days of past activity you want to show in your newsfeed. |
| Item Defaults | |
|
Item feedback |
Choose whether you want to allow comments or assessments by default when creating new items. Note These settings enable commenting and assessments; you still need to set permissions around who can add comments or assessments. |
| RSS Updates | |
|
Feedback RSS |
Notifies you when edits, comments, or assessments are made on one of your portfolio items (does not include changes that you make yourself). To use the RSS feeds you must subscribe to an external RSS reader. There are many free RSS readers, such as Live Bookmarks and Google Reader, available on the internet. |
| Ignore List | |
|
Ask for confirmation before ignoring items from users |
Select this check box if you want to recieve a confirmation dialog asking if you want to ignore items from a user. |
|
Ask for confirmation before restoring items from users |
Select this check box if you want to recieve a confirmation dialog asking if you want to restore items from a user. |
|
Invite RSS |
Notifies you when you receive a new invite to view another user's item. To use the RSS feeds you must subscribe to an external RSS reader. There are many free RSS readers, such as Live Bookmarks and Google Reader, available on the internet. |
| Sharing Settings | |
|
Invite Delivery Method |
Select Email Invitation if you want to receive an email when others invite you to view items from their ePortfolio. Note A copy of the invite always appears on your Invites page. |
|
Default Sharing Group |
Select a default sharing group to apply to all new items in your portfolio that meet your filter criteria. Use this option if you consistently share new items with the same group of users. |
Audience:
- Learner [42]
Adding artifacts
Audience:
- Learner [42]
Adding linked web addresses
If you want to include an existing website as an artifact in your ePortfolio, you can reference the address (URL) for the site rather than uploading files.
- On the My Items page, click Link from the Add button.
- Enter the Name you want the URL to be stored as.
- Enter the URL.
- Enter a Description of the site or its significance.
- Add any tags you want the artifact to have.
- Click Save.
Audience:
- Learner [42]
Uploading files
Upload files from your computer, personal storage device, or Learning Environment locker area that demonstrate your improvement or mastery in an area of interest.
- On the My Items page, click File Upload from the Add button.
- Click Upload to browse for the file you want to add.
- Click Done.
- Confirm that you selected the correct file, then click Next.
- Give the artifact a Name and Description.
- Add any tags you want the artifact to have.
- Click Save.
Audience:
- Learner [42]
Creating web documents
ePortfolio provides the option to create HTML artifacts using a simple HTML Editor. HTML files may contain formatted text, images, videos, audio files, and links to content in Learning Environment.
- On the My Items page, click Web Document from the Add button.
- Enter the File Name you want the file to be stored as.
- Use the HTML Editor to add your content.
- Click Next.
- Enter the Name you want to display for the file and a Description.
- Add any tags you want the artifact to have.
- Click Save.
Audience:
- Learner [42]
Adding audio recordings
You can record audio directly within ePortfolio, rather than pre-recording audio on your computer and uploading it as a file.
- On the My Items page, click Audio Recording from the Add button.
-
Ensure your microphone is set up correctly and click Record. You can also:
- Click Flash Settings to make adjustments to your microphone selection and volume.
- Click Play to listen to your recording.
- Click Clear to erase your recording.
- Click Next.
- Give the file a Name and Description.
- Add any tags you want the artifact to have.
- Click Save.
Audience:
- Learner [42]
Adding form responses
You are able to use add responses to form templates as an artifact to your ePortfolio. Forms templates, created by your institution or course leaders collect information using a set of question fields that you fill out.
- On the My Items page, click Form Response from the Add button.
- Click the name of the form template you want to fill out.
- Fill out the form template.
- In the Artifact Details area, provide a Name and Description unique to this form response.
- Add any tags you want the artifact to have.
- Click Save.
Audience:
- Learner [42]
Importing course content
Track your progress over time by including your course work in your ePortfolio. You can then review your work at any point in the future and compare it to other assignments and courses. You can also add course content artifacts to your ePortfolio directly from your courses. Click Add to ePortfolio while viewing grades, competencies, quiz results, or dropbox folder feedback.
Note If you import quiz or dropbox folder results into your ePortfolio, any learning objectives associated with the quiz or dropbox folder also import into your ePortfolio pre-associated with your course content artifacts.
- On the My Items page, click Course Results from the Add button.
- Click on the name of the course you want to import results from.
- Select the items you want to import, then click Next.
- Enter a Name and Description for each item.
- Add any tags you want the artifact to have.
- Click Save.
Tip Click Apply Tags to All Artifacts to add a set of tags to all items on the page.
Audience:
- Learner [42]
Using learning objectives in ePortfolio
Learning objectives are a type of ePortfolio item that enable you to take ownership of your learning by allowing you to manage and track personal learning goals.
You can:
- Associate learning objectives with artifacts, reflections, collections, and presentations that demonstrate progress toward your learning plan. If you submit a learning objective to a dropbox folder, its associated items go with it.
- Share learning objectives with rubrics attached to them to generate feedback and informal assessment from other ePortfolio users. (Items associated with a learning objective are not available to others unless you specifically share them.)
- Display learning objectives in presentations and add them to collections.
- Submit a learning objective to a dropbox folder for formal assessment. Associated items serve as evidence toward meeting the learning objective.
- Use learning objectives as an organizational tool by categorizing your ePortfolio items by learning experience.
- Delete learning objectives that are no longer relevant to your learning path.
Import learning objectives into your ePortfolio
If you are in an independent studies or co-op program, you might have the ability to directly import learning objectives into your ePortfolio.
-
On the My Items page, click
 Learning Objective from the Add button.
- Click on the course you want to import learning objectives from.
- Select the check boxes beside the learning objectives you want to add.
- Click Import.
Associate items with learning objectives
Do one of the following:
-
Click
 Associate Learning Objective from the context menu of an artifact, reflection, collection, or presentation.
- On the Edit page for an item, click Associate Learning Objectives.
-
On the My Items page, select the items you want to associate with a learning objective, then click Associate Learning Objective from the More Actions button.
Audience:
- Learner [42]
Using reflections
Audience:
- Learner [42]
Adding reflections
Use reflections to discuss items in your ePortfolio, record your thoughts on topics that interest you, set goals, and think critically about your learning.
Add a reflection
-
On the My Items page, click
 Reflection from the Add button.
- Give your reflection a Title.
- Enter your thoughts in the Reflection field.
- Add any tags you want the reflection to have.
- Select Allow others to add/view comments if they have sufficient permission if you want to provide others the option to comment on your reflection.
- Click Save.
Audience:
- Learner [42]
Associating reflections with items
Reflections can be independent ePortfolio items or associated with artifacts, learning objectives, collections, or presentations. Associating reflections with other items helps other users see the relationship between the items and makes it easier to revisit your goals and assumptions later.
Reflections are only visible to other users if you share them, associate them with an item, or add them to a collection or presentation.
- When you share a reflection that is associated with an item, users can only view the name of the associated item unless that item is also shared with them.
- Sharing an item associated with a reflection allows users to view the reflection as part of the item.
- If you include a reflection in a collection or presentation, it inherits the permissions of that collection or presentation.
See Understanding cascading permissions [33] for more information about how associations affect sharing in ePortfolio.
Associate a reflection with an artifact, learning objective, collection, or presentation
-
Click
 Edit from the context menu of an existing reflection.
- Click Add in the Associated Items section.
- Select whether you want to associate the reflection with an Artifact, Collection, Presentation, or Learning Objective.
- Select the items you want to associate from the list that appears, then click Add.
- On the Edit Reflection page, click Save and Close.
See also
Audience:
- Learner [42]
Creating presentations
Audience:
- Learner [42]
Adding a new presentation
Presentations let you compile ePortfolio items into a web project to showcase your achievements. Your presentations can have multiple pages and use different themes and layouts. Presentations provide a polished, professional medium to demonstrate your learning and accomplishments.
Adding a new presentation
-
On the My Items page, click
 New Presentation.
- Give the presentation a Name and Description.
- Add any tags you want the presentation to have.
- Select the check boxes in the Comments/Assessments section if you want to provide others the option to review your presentation when you share it.
- Click Save.
Audience:
- Learner [42]
Adding items to a presentation
Use the Content/Layout tab to add items to your presentations. You can add items on a single page or create multiple pages.
Add items to a presentation
- Click the Content/Layout tab on the Edit Presentation page.
- Click Add Component in the content area you want to add an item to.
- Select the type of item you want to add.
- Select the item you want to add.
- Click Add.
Audience:
- Learner [42]
Copying presentations
On the My Items page, click ![]() Copy from a presentation's context menu.
Copy from a presentation's context menu.
The following information copies:
- the presentation’s description, tags, and comments and assessment properties
- the theme
- the banner title, description, and appearance
- all pages, page layouts, page content, display options, and display orders
The following information does not copy:
- permissions
- comments or assessments for the presentation
- reflections associated with the presentation
Note You can copy presentations only from your own ePortfolio.
Audience:
- Learner [42]
Editing display options for items
- On the Content/Layout tab, open the context menu beside an item.
- Click Edit Display Options.
-
Change the Title or Description of the item, if desired.
Note This will only change the title or description within the presentation.
-
Choose whether you want the artifact to display in-place or as a link (if applicable).
NoteYou can display the following file types in-place: HTML, BMP, GIF, JPG, and PNG. Flash and QuickTime file formats require corresponding browser plugins.
- Choose whether you want to auto-fit the artifact to the content area it displays in, or maintain its original size (if applicable).
- Select which reflections associated with the artifact to display in the presentation (if applicable).
-
Select the appropriate options related to displaying comments and assessments.
Note The Comments enabled check box on the Edit Display options page corresponds to the Comments Enabled check box that appears on the Content/Layout tab. Selecting one enables the other and vice versa.
- Click Save.
Audience:
- Learner [42]
Modifying the presentation layout
Use the Content/Layout tab to change where the navigation area appears on presentation pages and the arrangement of content.
Edit Presentation NavigationSets where the page naviagation appears. This is a presentation-level setting; you cannot select a different navigation position per presentation page.
Edit Page LayoutSets the positioning of the content areas. This is a page-level setting; each page in your presentation can have different page layouts.
Item context menus enable you to move items to different content areas, change the order of items within a content area, and remove items from your presentation.
Use the Pages section of Content/Layout tab to add new pages to your presentation and reorder existing pages. If you have a large presentation, you can hide pages from the navigation by editing their Page Properties.
Audience:
- Learner [42]
Changing the presentation theme
Themes are default style templates that give your presentations a consistent look and feel. Themes are comprised of styles which control one aspect of the design. For example, there are separate styles that control the look of titles, links, dates, and images.
Your organization provides presentation themes, but you may be able to change some or all aspects of a theme.
Choose a theme
- On the Edit Presentation page, click the Theme tab.
- Click Select beside the theme you want to apply to your presentation.
Modify a theme
-
Click the
 Edit styles icon beside your current theme.
-
Select the page element you want to modify.
Tip Use the Filter drop-down list to view specific groupings of elements.
- Use the options that appear under the Preview area to edit the style.
- Repeat for remaining elements.
- Click Save.
Audience:
- Learner [42]
Setting banner text
A banner appears at the top of every page in a presentation. The presentation title usually appears in the banner, much like a header in a book. You can include additional text in the banner as a description.
On the Edit Presentation page, click on the Banner tab to enter a banner title and description.
Note The theme of the presentation controls the style of the banner, including the background and fonts used. Use the Theme tab to modify banner and presentation styles.
Audience:
- Learner [42]
Inserting links to presentation pages in content areas
Users can view the various pages of your presentation by clicking the page names in the page navigation panel. You can also link the user to another page within the presentation by adding links to content areas. This provides greater flexibility in customization and organization of your presentation.
For example, a student may have three separate pages on their eportfolio: an About Me page, a personal philosophy page, and her work experience. In the middle of her About Me page, she may reference her skills and insert a custom quicklink to direct readers to her resume for further information.
Link to presentation pages in content areas
- Click the Content/Layout tab on the Edit Presentation page.
- Click Page Properties from the context menu of the page you want as a link.
- Copy the Page Link URL.
- Click the page where you want the link to appear.
-
Click Edit from the context menu of the component you want to add your link to. Add a component to the page if none currently exists.
-
Insert the link using the URL you copied in step 3 through one of the ways below:
- Insert a quicklink using the HTML Editor
- Insert a link using Insert Stuff
- See Inserting quicklinks in the HTML Editor [44] and Inserting media files in the HTML Editor [45] for additional information on how to add your link.
- Once you export your presentation, or submit the presentation to a dropbox, all content on quicklinked pages become static and no further changes made to the pages are reflected.
See also
Audience:
- Learner [42]
Creating collections
Audience:
- Learner [42]
Creating a new collection
Collections are groups of artifacts, reflections, presentations, and learning objectives. An item can belong to multiple collections at the same time. For example, you can add a short story you wrote to a collection called “Fiction” as well as a collection called “Creative Writing 101” and there will only be one copy of the story (artifact).
Create a collection
-
On the My Items page, click
 New Collection.
- Give the collection a Name and Description.
- Add any tags you want the collection to have.
- Click Save.
- Select the check boxes in the Comments/Assessments section if you want to provide others with the option to comment or assess your collection when you share it with them.
Audience:
- Learner [42]
Adding items to a collection
There are multiple ways to add items to a collection:
- Add items manually on the Edit Collection page.
-
Add multiple items at once by clicking
 Add to Collection from the More Actions button.
-
Select Add to Collection from the context menu of an item.
- Create a Tag List on the Edit Collection page that defines which items to automatically include in a collection based on their tags.
Add an item to a collection from the Edit Collection page
-
Click Edit from the context menu of the collection you want to add items to.
- Click Add to Collection.
- Click Artifacts, Presentations, Reflections, or Learning Objectives.
- Select the items you want to add.
- Click Add.
Add an item to one or more collections from the My Items page
- Select the items you want to add to the collection from the My Items listing.
-
Click Add to Collection from the More Actions button.
- Select the collections you want to add the items to.
- Click Add.
Add an item to a collection using an item's context menu (drop-down)
-
Click Add to Collection from the context menu of the item you want to add.
- Select the collections you want to add the item to.
- Click Add.
Create a tag list that automatically populates a collection
Important All items that use the tags that you specify in the tag list are automatically added to the collection. If you share the collection with other users, you automatically share all of the items.
-
Click Edit from the context menu of the collection you want to add items to.
- Click Add to Collection.
- Click Tag List.
- Give your tag list a name.
- Enter the tags you want in the tag list.
- Click Save.
Tip Create multiple tag lists if you want to create an OR condition, where items tagged with either "x" or "y" are added to a collection. For example, if you want to add all items tagged with the phrase "Science and Technology" and either "Green Energy" or "Solar Energy", you should create two tag lists. The first tag list should contain the phrases "Science and Technology" and "Green Energy". The second tag list should contain "Science and Technology" and "Solar Energy".
Audience:
- Learner [42]
Understanding the basic concepts in sharing
Audience:
- Learner [42]
Viewing items shared with you
There are various ways for you to discover, categorize, follow, and review content shared with you in ePortfolio.
[46]Invites
Invites enable you to promote the content you're sharing with specific people. When you share an item with others, you also have the option to send an invite to those you're sharing your item with from the Sharing Settings dialog. See Sending invites [47] for more information.
An invite contains information about who shared the item, when it was shared, what type of item it is, and any description or tags it has. The sender might also include a message letting you know why they shared the item.
When you receive an invite from another user to view an item in their ePortfolio, a notification appears in the Message alerts on the minibar and the invite displays in the Unread Invites area of your dashboard. You might also receive an email informing you of the invite. You can subscribe to the Invite RSS feed from your ePortfolio settings [6] to receive external updates about new invites.
Subscriptions
Subscriptions enable you to follow activity on items or from specific people that interest you. You can subscribe to user or item activity from your dashboard, the Explore page, or your invites.
- Subscribe to an item by clicking Subscribe in the context menu of the item.
-
Subscribe to other users by toggling the
 Subscribe icon beside their names.
Use the Subscriptions filter on your dashboard to view activity on items or from users you subscribed to. Recent subscription activity also appears in your minibar alerts.
Unsubscribe to items or users by toggling the ![]() icon or click Unsubscribe.
icon or click Unsubscribe.
Friends List
The Friends List filter on the dashboard enables you to view content shared with you or publicly from friends in your pager list.
Minibar alerts
Alerts on the minibar signal new activity related to your subscriptions and invites.
- The Message alerts display recently received invites.
- The Update alerts display assessments made on items or by people you've subscribed to.
- The Subscription alerts display comments made on items or by people you've subscribed to.
Email and SMS notifications
If you want to receive ePortfolio updates externally, use the Notifications tool located in your personal menu on the minibar to set up the following instant notifications:
- feedback added to subscribed items Receive updates about comments and assessments made on items or by users you've subscribed to.
- another user has subscribed to your updates Receive a notification when someone has subscribed to you or one of your items.
- feedback added to my items Receive updates about comments and assessments made on your items.
See also
Audience:
- Learner [42]
Sharing with internal and external users
Use permissions to share ePortfolio items with other users. You can set up separate permissions options for each artifact, collection, reflection, presentation, and learning objective in your ePortfolio so you can pick and choose what content you share with others. You can assign permissions to individual users, sharing groups, groups of users based on course or department enrollment, or the general public through a URL (presentations only). You can choose whether others can see the item, see comments, see assessments, add comments, add assessments, and/or edit the item.
Sharing items with internal users
You can share items with other users in your organization by selecting individual users, all users in a course or group you are enrolled in, or a previously saved sharing group.
For information on saving permission settings using a sharing group, see Setting up sharing groups [34].
Assign permissions for a user or group of users
-
Click
 Share from the context menu of the item you want to make available to others.
- Select when you want users to see the item in the Visibility section of the Sharing Setting dialog.
- Click Add Users and Groups.
- Browse for the users or sharing groups you want to add. Use the Search for field to narrow your browsing results. Users with cascading roles must perform a search to display results.
-
Click on users or sharing groups in the browse listing to add them to the Selected Users list. Click the
 Remove icon beside users or sharing groups you want to remove from the Selected Users list.
-
Select the permissions you want the selected users to have and click Add. View more detail about permission options [32].
Note You can adjust permissions for individual users by clicking the
Edit Permissions icon beside their name in the Sharing List grid. You can adjust permissions for sharing groups you've created by clicking the Edit Sharing Group link beside their name in the Sharing List grid.
- If you want to send an invite to specific users in the Sharing List, select the check boxes beside their names and click Send Invite.
- Click Close.
Sharing presentations with external users
You can share ePortfolio presentations with people who are not part of your organization such as friends, parents, or potential employers.
You can share presentations with external users in two ways:
- You can make the presentation publicly available to anyone through a URL. When you share a presentation this way people can only view the presentation. They cannot add comments to, add assessments to, or edit the presentation.
- You can send a personal invite to view your presentation via an email and the recipient can follow the attached link to view the presentation. The recipient must set up a username and password, and then they can see and add comments or assessments based on the permissions you gave them. External users cannot edit presentations.
Make a presentation publicly available through a URL
Note If you make a presentation public via URL, the system includes social media icons (Twitter, Google+, and Facebook) at the top of your presentation to enable further sharing.
-
Click Share from the context menu of the presentation you want to make available by URL.
- Select Anyone with the URL below can access this item from the presentation's Sharing Settings and click Close. Share the provided URL with others.
Make a presentation externally available to specific people and assign them permissions
-
Click Share from the context menu of the presentation you want to make available to external users.
- Click Add Users and Groups from a presentation's Sharing Settings.
- Click Click to share the presentation with an external user.
- Enter the External Email Address of the external user you want to send an invite to and click Add.
- Select the permissions you want the external users to have and click Add. The system automatically notifies external users of their granted permissions. View more detail about permission options [32].
-
Click Close.
Note The recipient must follow the link in the invite and set up a username and password to view the presentation. The invite expires after three days (or another amount of time set by your organization).
Sending invites
When you send an invite to internal users you are sharing an item with, you have the opportunity to leave them a message about why you are sharing the item and what you’d like them to do with it. Depending on how the user’s preferences are set up, they will receive the message in their email, the Invites area of their dashboard, or an RSS Reader. Recent invites also appear in the Message alerts on the minibar.
Send an invite
- In the Sharing Settings dialog for an item, send invites to specific users in the Sharing List by selecting the check boxes beside their names, then click Send Invite.
- Complete the invite and click Send.
Important If you send an invite to a sharing group that includes all users at your organization or all users in a particular course or department, all of the users in the group will receive the invite. This may be bothersome to users who do not know you.
See also
Audience:
- Learner [42]
Creating quicklinks to ePortfolio items
Create quicklinks to ePortfolio content in the same way as other quicklinks. However, the person following the link must have that item shared with them. If you want to include quicklinks to ePortfolio items in your course content, ensure your course participants have permission to view the item.
Create a quicklink to an ePortfolio item
- Open the HTML Editor.
-
Click
 Insert Quicklink.
- Click ePortfolio Item from the Insert Quicklink dialog.
- Select whether you want to link to a personal or shared item.
-
Do one of the following:
- Click on the item you want to link to.
- Click Options to edit your link title and choose how you want the link to open. Click Insert.
- Save the HTML file.
Similarly, if you include a quicklink in an ePortfolio item to a Learning Environment item, such as a content file, individuals can only follow the link if they have permission to view that item; otherwise they receive an error message letting them know they do not have permission to view the item.
Audience:
- Learner [42]
Sharing permission options
| Permission | Description | Available for |
|---|---|---|
|
View |
Allows selected users to see your ePortfolio item on the Explore page. |
Anyone |
|
See comments from others |
Allows selected users to see the comments other users have left on your ePortfolio item. |
Internal users External user with personal invite |
|
Add comments |
Allows selected users to add comments on your ePortfolio item. |
Internal users External user with personal invite |
|
See assessments from others |
Allows selected users to see rubric assessments other users have left on your ePortfolio item. |
Internal users External user with personal invite *Not available for reflections |
|
Add assessments |
Allows selected users to evaluate your ePortfolio item using a rubric. Tip Make sure you add the rubric you want evaluators to use on the item's Edit page. |
Internal users External user with personal invite *Not available for reflections |
|
Edit |
Allows selected users to make changes to your ePortfolio item. You can track changes in the item’s Change Log. |
Internal users |
Note To use the comments and assessments permissions, you must make sure the comments and assessments check boxes are enabled on the item's Edit page and that a rubric for assessing items has been attached to the item. These check boxes are selected by default, but it is possible to clear them (if you want to temporarily remove the ability to comment on or assess an item), and you can change the default setting so they are not selected on new items.
Audience:
- Learner [42]
Understanding cascading permissions
Items in collections and presentations
When you include an item in a collection or presentation, the item inherits permissions from the collection or presentation (permissions are cascading), with the following exceptions:
- The Add Assessments permission is not inherited because it requires that a rubric be associated with each item.
- The Edit permission is not inherited because it would allow users to make major, possibly unwanted, changes to your ePortfolio. If you want individuals to be able to edit items in a collection or presentation, you must give them the Edit permission on each item individually.
Inherited permissions do not override existing permissions on items. For example, if you give an individual the view, see comments from others, and add comments permissions for a specific item, but only the view permission is set for a collection that contains the item, the individual is able to see and add comments to the item. This is the case regardless of whether it is accessed from the collection or outside the collection.
Items associated with a reflection
When you associate a reflection with another item, the reflection does not inherit permissions from the item, nor does the item inherit permissions from the reflection.
Sharing a reflection associated with an item, only allows users to view the name of the associated item. However, sharing an item associated with a reflection allows users to view the reflection as part of the item.
Audience:
- Learner [42]
Setting up sharing groups
Sharing groups let you save the permissions you want a user or group of users to have so you can reuse the permissions for other items. You can create sharing groups for individual users or for all users in a particular course or group. You can have multiple sharing groups for the same users that you apply in different situations. For example, you can create sharing groups named "Comment" and "Edit and Review" and share them with the same group of peers. You would use the first sharing group for items you want to collect general feedback on and the second sharing group for items that you want others to collaborate on or revise in detail.
An organization, department, or course can also set up sharing groups and share them with you. Sharing groups that are shared with you are either optional (you can choose to apply them to specific items) or automatic (you have to use them). Automatically shared groups are either visible (appear in your Sharing Groups area) or hidden (information on the group is not available to you).
Access Sharing Groups
Click Sharing Groups from the tool navigation.
Create a new sharing group
- On the Sharing Groups page, click New Sharing Group.
- Give the profile a Name and Description.
- Click Save and Close.
Add or change users and permissions in a sharing group
- Select the sharing group you want to manage by clicking its name.
-
Click Add Users to add new users to the sharing group.
- Browse for the users you want to add. Use the Search for field to narrow your browsing results. Users with cascading roles must perform a search to display results.
-
Click on users or groups of users in the browse listing to add them to the Selected Users list. Click the Remove icon beside users or groups of users in the Selected Users list to remove them from the list.
- Select the permissions you want the selected users to have.
- Click Add.
-
Click the Edit icon beside the user or group of users for which you want to edit permissions. Select new permissions and click the Save link.
-
Click the Remove icon to remove a user or group and their permissions from the sharing group.
- Click Save and Close.
Set a default sharing group
A default sharing group can make sharing easier if you consistently share items with the same group of users.
-
Click
 Settings from any page in ePortfolio.
- Select a Default Sharing Group in the Sharing Settings section.
- Use the Item Type Filter check boxes to specify which item types to automatically apply the default sharing group to.
- Use the Tag Filter to restrict which items the default sharing group applies to by tags.
- Click Save.
Audience:
- Learner [42]
Removing sharing permissions
Remove permissions from an item
-
Click ePortfolio on the navbar or in the My Settings widget.
-
On the My Items page, click Share from the context menu of the item you want to modify permissions for.
-
Click the Remove icon next to the user or group of users you want to remove permissions from.
Remove permissions in a sharing group
-
Click ePortfolio on the navbar or in the My Settings widget.
- Click Sharing Groups from the tool navigation.
- Select the group you want to modify permissions for by clicking its name.
-
Click the Remove icon next to the user or group of users you want to remove permissions from.
Note You cannot modify sharing groups that your course or organization shares with you.
Delete a sharing group
-
Click ePortfolio on the navbar or in the My Settings widget.
- Click Sharing Groups from the tool navigation.
-
Click the
 Delete icon beside the group you want to delete.
Note You cannot delete sharing groups that your course or organization share with you.
Temporarily hide an item from all users
-
On the My Items page, click Share from the context menu of the item you want to hide.
- Click Show Display Options and change the Visibility options available.
Tip Temporarily hide an item when:
- You want to make changes to it and don’t want others to see it in draft stages.
- You want to make it available on a specific, predetermined date and want to set up sharing permissions in advance.
Audience:
- Learner [42]
Ignoring and restoring items from users
If you have the appropriate permissions, you can ignore shared items from other users. Once you ignore a user, all items and invites belonging to them are hidden from the following:
- your newsfeed
- the Unread Invites area
- the Invites page
- the Explore page
If you have ignored a user's shared items, you can restore the items at any time, allowing you to view all items shared with you by the previously ignored user.
Ignore items from a user
-
Click
 Ignore Items from User from the context menu of an item authored by the user whose items you want to ignore.
- Click Ignore from the Ignore Items from User? dialog to confirm you want to proceed with this action.
Note Once you ignore items from a user, all items, including ones you subscribed to, are no longer visible to you.
Restore items from a user
-
On any ePortfolio page, click Settings.
-
Click Restore Items for the user whose items you want restored.
- Click Restore on the Restore Items from User? dialog to confirm you want to proceed with this action.
Audience:
- Learner [42]
Importing and exporting items
Audience:
- Learner [42]
Importing ePortfolio items
You can only import Desire2Learn ePortfolio packages into your ePortfolio. If you have other items you want to add to your ePortfolio, use the Artifacts tool to add them individually.
Import an ePortfolio package
- On the Import/Export ePortfolio Content page, click Import.
- Upload your import file.
- Click Next.
- On the Preview page for the import package, enter any New Tags that you want all imported items to have.
- Click Import.
Audience:
- Learner [42]
Exporting ePortfolio items
When you export an item, you also export the item's description, tags, and settings. You do not export information about the user who created the item, users who left comments on the item, or assessments for the item. When you import an item, the system assumes that the item was created by the importing user.
With the exception of HTML presentations [40], you cannot export items for offline viewing. Exported items can only be imported into another Desire2Learn ePortfolio or systems that support the Desire2Learn ePortfolio XML format.
You can export your entire ePortfolio or specific items. If you export specific items, select Automatically include associated items to ensure you also export any related items you might want. If an item has multiple associations, it will only appear once in the exported zip file.
Export all items in your ePortfolio
- On the Import/Export ePortfolio Content page, click Export.
- Click All Items.
-
Remove unwanted items from the export list by clicking the Remove icon beside those items.
- Click Export.
-
Click View progress of the export package and click the link for your export file when the file packaging completes.
Tip If you want to navigate away from this page or close the window, you can retrieve your export package from the Import/Export area in the Recent Activity list.
- Save the export file to your computer or storage device.
Export specific items in your ePortfolio
- On the Import/Export ePortfolio Content page, click Export.
- Click Selected Items.
- Click Add Items.
- Select the items you want to export and click Add.
-
Remove unwanted items from the export list by clicking the Remove icon for those items.
- Click Export.
-
Click View progress of the export package and click the link for your export file when the file packaging completes.
Tip If you want to navigate away from this page or close the window, you can retrieve your export package from the Import/Export area in the Recent Activity list.
- Save the export file to your computer or storage device.
Export a single ePortfolio item
Click ![]() Export from the context menu of an artifact, reflection, collection, presentation, or learning objective. If you export a presentation, there is an option to export it to HTML format. See Exporting presentations to HTML [40] for more information.
Export from the context menu of an artifact, reflection, collection, presentation, or learning objective. If you export a presentation, there is an option to export it to HTML format. See Exporting presentations to HTML [40] for more information.
See also
Audience:
- Learner [42]
Exporting presentations to HTML
If you have the appropriate permissions, you can export presentations to HTML format directly from a presentation's context menu.
Exporting your presentation to HTML format enables you to keep a copy of your presentation in a viewable format external to the system. This is useful if you change institutions and you don't want to lose your work. Once you export your presentation to HTML, you can host it externally on your own website or save it on your computer to view offline.
Note You cannot import an HTML presentation back into ePortfolio.
Export your portfolio to HTML
-
Click
 Export from the context menu of the presentation you want to export.
- Choose Export HTML version of presentation.
- If you want your HTML presentation to include links to pages in the system, select All system links. Links to pages within the system require users to log in to the system and have the appropriate permissions.
- Click Next.
-
Click the link for your export file when the file packaging is complete.
Tip If you want to navigate away from this page or close the window, you can retrieve your export package from the Import/Export area in the Recent Activity list.
- Save the export file to your computer or storage device.
Changes to presentation properties during HTML export
| Property | Notes |
|---|---|
|
Action bar |
Does not include the action bar at the top of a presentation |
|
Artifacts |
Includes embedded artifacts and links to artifacts Embedded image artifacts retain their alt tags Embedded image and media artifacts retain their size settings Artifacts retain their type icon if displayed as a link inline Artifacts retain their title and description set using Edit Display Options |
|
Assessments |
Includes assessments made on items within the presentation Does not include assessments made on the presentation |
|
Comments |
Includes all comments for artifacts and reflections Does not include comments made on the presentation |
|
Forms |
Does not include forms linked via a quicklink |
|
Learning Objectives |
Includes embedded learning objectives and links to learning objectives |
|
Permissions |
Does not retain permissions; anyone can view content within an HTML presentation |
|
Presentation layout |
Page links, navigation settings, page settings, page names, and text areas remain the same |
|
Presentation theme |
Presentation themes retain their style settings, including custom replaced images |
|
Profile details |
Profile information exports as displayed in the presentation, including customized profile titles and social media icons Only the fields set to display are exported; hidden profile information does not export with the presentation |
|
Quicklinks |
All quicklinks retain their links to external URLs and artifacts stored within the export package Quicklinks to system resources require users to log in to the system and have the appropriate permissions |
|
Reflections |
Includes embedded reflections and links to reflections Does not include reflections associated with the presentation |
|
Social media |
Does not include social media icons from the top of public presentations |
|
Text areas |
Includes all text formatting, equations and custom characters |
Audience:
- Learner [42]
Understanding the changes made to exported item properties
| Property | Notes |
|---|---|
|
Access Log for presentations |
Does not include |
|
Assessments |
Does not include |
|
Change Log for Edit permission |
Does not include |
|
Comments |
Includes comments, does not retain commenter's name |
|
Contents of a collection |
Includes collection contents only if you export its items at the same time |
|
Forms |
Includes form artifacts; does not include the form that the artifact is based on System fields do not maintain their values; the system generates these values based on the user that imports the form Does not maintain rubrics embedded in a form |
|
Items associated with a reflection |
Includes associated items only if you export the items at the same time |
|
Items in a presentation |
Includes items within a presentation only if you export the items at the same time |
|
Permissions |
See [item] only |
|
Presentation layout |
Navigation settings, page settings, page names, and text areas remain the same Maintains profile settings, but displays information corresponding to the user who imports the presentation |
|
Presentation theme |
Does not include presentation theme; presentations revert to the default theme of the system on import |
|
Reflections associated with an artifact |
Includes associated reflections only if you export the reflections at the same time |
|
Rubrics associated with an item |
Does not include |
|
Tag lists for a collection (dynamic collections) |
Does not retain tag lists; all collections become static on export |
Audience:
- Learner [42]
Links:
[1] http://staging.docs.d2l/en/eportfolio-mobile-application
[2] http://staging.docs.d2l/en/understanding-dashboard
[3] http://staging.docs.d2l/en/understanding-my-items
[4] http://staging.docs.d2l/en/understanding-explore-page
[5] http://staging.docs.d2l/en/accessing-import-export-tool
[6] http://staging.docs.d2l/en/understanding-eportfolio-settings
[7] http://staging.docs.d2l/en/adding-linked-web-addresses
[8] http://staging.docs.d2l/en/uploading-files
[9] http://staging.docs.d2l/en/creating-web-documents
[10] http://staging.docs.d2l/en/adding-audio-recordings
[11] http://staging.docs.d2l/en/adding-form-responses
[12] http://staging.docs.d2l/en/importing-course-content
[13] http://staging.docs.d2l/en/using-learning-objectives-ePorfolio
[14] http://staging.docs.d2l/en/adding-reflections
[15] http://staging.docs.d2l/en/associating-reflections-with-items
[16] http://staging.docs.d2l/en/creating-new-presentation
[17] http://staging.docs.d2l/en/adding-items-presentation
[18] http://staging.docs.d2l/en/copying-presentations
[19] http://staging.docs.d2l/en/editing-display-options-items
[20] http://staging.docs.d2l/en/modifying-presentation-layout
[21] http://staging.docs.d2l/en/changing-presentation-theme
[22] http://staging.docs.d2l/en/setting-banner-text
[23] http://staging.docs.d2l/en/inserting-links-to-presentation-pages-content-areas
[24] http://staging.docs.d2l/en/creating-new-collection
[25] http://staging.docs.d2l/en/adding-items-collection
[26] http://staging.docs.d2l/en/configuring-assessment-settings
[27] http://staging.docs.d2l/en/editing-commenting-item
[28] http://staging.docs.d2l/en/submitting-items-to-dropbox-folder-for-assessment
[29] http://staging.docs.d2l/en/viewing-items-shared
[30] http://staging.docs.d2l/en/sharing-with-internal-external-users
[31] http://staging.docs.d2l/en/creating-quicklinks-eportfolio-items
[32] http://staging.docs.d2l/en/node/2328
[33] http://staging.docs.d2l/en/understanding-cascading-permissions
[34] http://staging.docs.d2l/en/setting-up-sharing-groups
[35] http://staging.docs.d2l/en/removing-sharing-permissions
[36] http://staging.docs.d2l/en/ignoring-restoring-items-from-users
[37] http://staging.docs.d2l/en/sharing-items-using-eportfolio-mobile-application
[38] http://staging.docs.d2l/en/importing-eportfolio-items
[39] http://staging.docs.d2l/en/exporting-eportfolio-items
[40] http://staging.docs.d2l/en/exporting-presentations-to-html
[41] http://staging.docs.d2l/en/importing-exporting-eportfolioitems
[42] http://staging.docs.d2l/en/taxonomy/term/3
[43] http://staging.docs.d2l/en/understanding-my-items#activity
[44] http://staging.docs.d2l/en/inserting-quicklinks-in-html-editor
[45] http://staging.docs.d2l/en/inserting-media-files-in-the-html-editor
[46] http://staging.docs.d2l/en/book/export/html/1936
[47] http://staging.docs.d2l/en/sharing-with-internal-external-users#Sending invites