Getting Started in Learning Environment
Learner topics
The following topics introduce Learning Environment's basic user interface, navigation tools, and how to manage your account settings.
What tasks should I complete before logging in to Learning Environment for the first time?
What are the basics of Learning Environment?
What are account settings and how do I set them?
What are notifications and how do I set them?
Audience:
- Learner [12]
Tasks to complete before logging in to Learning Environment
Audience:
- Learner [12]
Running a system check
We recommend you perform a system check to ensure your computer contains the supported system and software requirements used in Learning Environment.
Click Please click here for a System Check before you login on the Login page to run the system check.
Audience:
- Learner [12]
Changing your password
Your institution should provide you with a web address, username, and password for logging into Learning Environment. After the first time you log in, change your assigned login password to a new password that only you would know.
-
Do one of the following:
- Click Account Settings from your personal menu on the minibar, then click Change Password in the Account Settings tab.
- Click Change Password in the My Settings widget.
- Enter your old password in the Old Password field.
- Enter your new password in the New Password field.
- Confirm your new password in the Confirm New Password field.
- Click Save.
Audience:
- Learner [12]
Learning Environment basics
Audience:
- Learner [12]
Learning Environment user interface
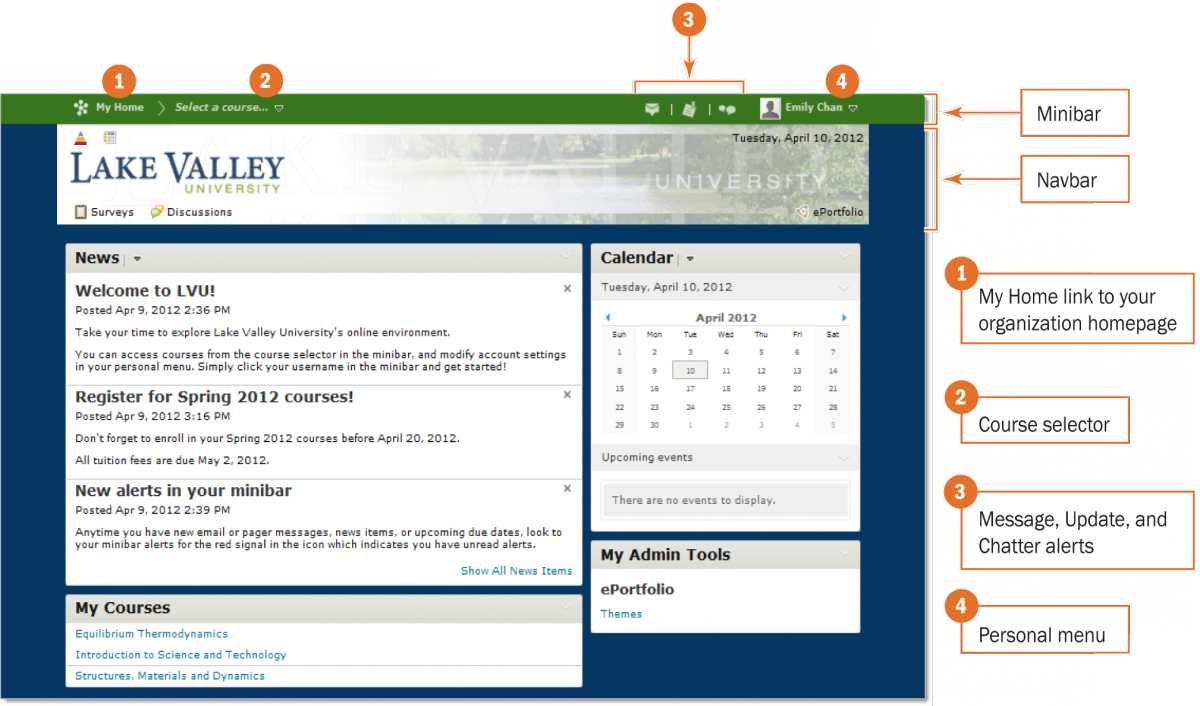
Example of an organization's My Home page
My Home and Course Home
My Home is your starting point inside Learning Environment. It is also your organization's homepage where you can access widgets, tool links on the navbar, organization-level content, and other available resources.
Course Home is the first page you see when you navigate to a course. Similar to My Home, it also contains widgets, tool links on the navbar, and resources that enable you to access your personal information, account settings, and course specific content.
Minibar
The minibar is your main navigation tool to courses and personal settings in Learning Environment. The minibar contains a link to My Home, the course selector, alerts, and your personal menu.
Note If you impersonate a user, the name on the minibar becomes the name of the user you are impersonating. You can also view impersonation information in the personal menu. Click the ![]() Stop impersonating [user] icon from the personal menu on the minibar to end an impersonation session. You may not have the ability to impersonate users. Contact your system administrator if you think you should have the ability to impersonate users and don't.
Stop impersonating [user] icon from the personal menu on the minibar to end an impersonation session. You may not have the ability to impersonate users. Contact your system administrator if you think you should have the ability to impersonate users and don't.
Course selector
Your courses are listed in the course selector, and you can sort them by course name or by date last accessed. You can also select specific courses from the course selector and pin them to the top of the list for easier navigation.
Alerts
![]() Messages Email, Pager messages, and ePortfolio invites.
Messages Email, Pager messages, and ePortfolio invites.
![]() Updates New and updated news posts, upcoming end dates and due dates, new and updated grades, and ePortfolio item assessments.
Updates New and updated news posts, upcoming end dates and due dates, new and updated grades, and ePortfolio item assessments.
![]() Subscriptions New blog posts, and discussion posts in forums, topics, and specific threads you subscribed to. Comments left on ePortfolio items and ePortfolio subscription notifications.
Subscriptions New blog posts, and discussion posts in forums, topics, and specific threads you subscribed to. Comments left on ePortfolio items and ePortfolio subscription notifications.
If you have unread alerts, a red circle appears on the appropriate alert icon.

Example of a new unread item in the Update alert
Personal menu
The personal menu contains links to your profile, notification options, account settings, and logout. Click your name on the minibar to open the personal menu.
Navbar
The navbar is your main navigation tool within a course. It displays the course name, tool links, custom links, and custom link groups. Each course can have its own unique navbar to provide relevant tools and resources.
Audience:
- Learner [12]
Accessing a course
Access the course you want from the course selector. Click Load More Courses to expand the course list, or use the Search field to find your course.
Audience:
- Learner [12]
Creating a personal profile
Create and edit your personal profile through the Profile tool. Filling out your profile is optional, but this feature is a great way for social networking and meeting other users in a course.
Your profile information can appear in the Classlist and ePortfolio presentations. Your profile picture might appear next to your discussion posts, your name in classlists, and ePortfolio contributions.
Profile information also appears on profile cards, which display whenever you hover over or click on the thumbnail image of a user, if your organization enables this feature.
Depending on the information you include in your profile and what your organization enables, profile cards can show other users any of the following:
- your role in the organization
- your picture, or a generic image
- your personal tagline
- a link to your personal homepage
- your online status
- icons that link to the social networks you belong to
- links to contact you via Desire2Learn Email or the Pager tool
Note Missing information from your profile will not appear on your profile card.
Create your personal profile
- Click Profile from your personal menu on the minibar.
- Fill in the text fields. You can enter information about your social networks, contact information, education and work, and personal details such as your birth date, hobbies, and favorite things.
- If you want to upload and display a profile picture, click Change Picture, browse and select your image, then click Done.
- Click Save and Close.
Note You can view and edit your profile from Classlist. You can also edit your tagline directly on your profile card.
Audience:
- Learner [12]
Changing your email address
You may receive important login and enrollment information via email, so it is essential that you update your preferred email address if it has changed since registration.
-
Do one of the following:
- Click Account Settings from your personal menu on the minibar, then click Change Email in the General Settings section of the Account Settings tab.
- Click Email Address in the My Settings widget.
- Enter your Learning Environment password in the System Password field.
- Enter your new email address in the New Email field.
- Click Save.
Audience:
- Learner [12]
Changing your reply-to email address
By default, replies to email you send in the system go to your inbox in the Email tool. If you prefer to receive email replies at an external email address, update the 'Reply To' Email Address field in your Email settings. This means that when users reply to your email, the reply-to address you specify appears in their "To:" field.
Change your reply-to email address
-
Do one of the following:
- Click Account Settings from your personal menu on the minibar and click the Email tab.
-
Click
 Go to Email from the
  Message alert on the minibar, and click Settings.
- Click Account Settings in the My Settings widget and click the Email tab.
- Enter your external email address in the ‘Reply To’ Email Address field.
- Click Save.
Audience:
- Learner [12]
Account Settings
Audience:
- Learner [12]
Accessing Account Settings
- Click Account Settings from your personal menu on the minibar.
-
Use the tabs across the top of the page to view and edit display options:
- Account Settings
- Discussions
Note Some account settings might not be available depending on how your institution has set up Learning Environment.
Audience:
- Learner [12]
Setting your account preferences
Use the Account Settings tool to customize and manage your personal preferences for things such as your online status, Learning Environment's appearance, accessibility options, language and region, Discussions settings, and Email options.
Account Settings
Settings on this tab are not related to a specific tool.
General Settings
Enables you to change the email address [6] where you receive system notifications or change your login password [2].
Font Settings
Adjusting the font face and font size changes the default font and size of text in the system. It does not affect images, documents, and other objects such as math equations.
Dialog Setting
The Show secondary window as options enables you to set secondary windows as pop-ups instead of dialog boxes. This setting helps screen readers and other assistive technologies separate the content of the secondary window from the main window. If you are using assistive technology such as a screen reader, we strongly recommend showing secondary windows as pop-ups.
HTML Editor Settings
Provides the option for you to turn off the rich text editor. The HTML editor has many additional rich text features that might be difficult to navigate with assistive technology. This option simplifies pages that have text fields, while still allowing you to include HTML content.
Video Settings
Select Optimize video presentation for programmatically-driven assistive technologies if you use assistive techonology, such as a screen reader, to navigate the web. This option ensures that your assistive technology can detect embedded videos; it does not affect the accessibility of specific video players.
Locale & Language
Preferred Locale and Language Sets which locale to use for screen orientation, text, and graphics in the system. The options in the drop-down list correspond to the locale options available at your institution. Administrative staff and course designers can override your preferences for specific pages and courses.
Clock Sets whether time displays in 24-hour or 12-hour clock format.
First Day of the Week Sets which day appears first in your calendar.
Date Sets the display format of dates in the system.
Number Format Sets the display format of numbers in the system.
Percentage Format Sets the display format of percentages in the system.
Time Zone
Sets all dates that include times in Learning Environment to correspond with the time zone you specify.
Signing In
Online Status Sets whether you appear offline or online to other users when you are logged into the system.
Application Settings
Click Revoke Access if you want to force all your applications or devices to renew their authentication. This ensures that others cannot, for example, access your grades or send emails as you if you lose a mobile device or discover that a linked application is compromised.
Discussions
Display Settings The following display settings are available:
- Always show the Discussion Topics List Use this setting to show or hide the list of topics in the View Topic and View Thread pages. Hide it to save space or show it to switch between topics quickly.
- Display deleted posts Use this setting to display deleted posts when browsing topics. You must also have the permission See Deleted Posts enabled to see deleted posts.
Reply Settings Use this setting to automatically include the original post by default when composing a reply.
Email Options
Track activity for messages sent to internal email addresses Tracks the status of sent messages (either read or unread), and when messages are replied to and/or forwarded. The View Recipient Activity link appears on messages in the Sent Mail folder.
Include original message in email replies Sets whether to include original messages with your replies.
Send a copy of each outgoing message to [specified email address] Sends a copy of all the emails you send to a specified address. Click the Change email address link to specify the address to which you want to send copies. Changing this address will change your external address for all mail sent from the Desire2Learn application.
Save a copy of each outgoing message to the Sent Mail folder Saves a copy of your sent messages to a folder for convenient record keeping.
'Reply to' Email Address If users reply to email you've sent from the Email tool, the reply-to address you specify appears in their "To:" field.
Email Signature Create an email signature to include at the bottom of your email messages.
Display Options
Show the Message Preview pane Enables you to browse emails by displaying them in a preview pane at the bottom of your message list.
Show the Folder List pane Sets whether you see a list of folders in a left panel when reading messages.
Mark messages as read when viewed in the Message Preview pane Using the preview pane to read your messages will mark them as "read".
Show internal email addresses in the Address Book Internal addresses for your system contacts will appear in the Address Book.
Show external email addresses in the Address Book External addresses for your system contacts will appear in the Address Book.
Allow filtering messages and contacts on group enrollment Controls whether groups and sections are listed in the Filter By field in the message list and the address book.
Forwarding Options
Forward incoming messages to an alternate email account Enter an address into this field to redirect email received in the Email tool to another address. Choose how you want to handle messages within the Email tool after they forward to your email address.
See also
Audience:
- Learner [12]
Notifications
Audience:
- Learner [12]
Accessing Notifications
Do one of the following:
- Click Notifications from your personal menu on the minibar.
-
Click
 Notifications in the News widget menu.
-
Click Notifications in the My Settings widget.
Audience:
- Learner [12]
Setting your notifications
The Notifications tool enables you to:
- Receive instant notifications about course activity, such as grades, new discussion posts, upcoming quizzes, dropboxes, and news items. You can also choose to receive instant notifications about ePortfolio feedback and subscription activity.
- Subscribe to a summary of activity for each course and receive a daily email.
- Specify your preferred email address and mobile number for instant notifications. You can choose a different email address than your system email address.
Table of contents
- Set up an email contact method
- Set up a mobile contact method
- Subscribe to a summary of activity
- Subscribe to instant notifications
- Exclude courses from notifications
- Restore excluded course notifications
Set up an email contact method
- Click Enable email notifications on the Notifications page.
- Select your system email or custom email. If you select Use custom email, enter your email address in the text field.
- Click Save.
Set up a mobile contact method
- Click Register your mobile on the Notifications page.
- Select your Country, your Mobile Carrier, and enter your Mobile Number in the form.
- Click Save.
- After you receive a registration confirmation code on your mobile device, enter it in the Confirmation Code field.
- Click Confirm.
Subscribe to a summary of activity
Note You must set up your email contact method on the Notifications page to subscribe to a summary of activity.
- On the Notifications page, select the delivery frequency you want from the How often? drop-down list.
- Select when you want to receive your summary from the At what time? drop-down list.
- Click Save.
Subscribe to instant notifications
-
On the Notifications page, enable instant notifications for specific course activity and updates by doing any of the following:
- Select the Email check box to enable email notifications.
- Select the SMS check box to enable SMS notifications.
- Select the Campus Life check box to enable Campus Life notifications.
- Click Save.
- Customization options are available if you want to include your grade value in Grades notifications, and if you want to allow past, future, and inactive course enrollments to send you notifications. Go to the Customize Notifications section on the Notifications page and select the check boxes beside the options you want to enable.
- Users with cascading enrollments will only receive notifications for the org unit they are initially enrolled in (i.e., the source enrollment) and will not receive notifications from any org units they are enrolled in as an indirect result of their cascading role. This prevents these users from being flooded with notifications from potentially thousands of courses.
Exclude courses from notifications
- Click Manage my course exclusions in the Exclude Some Courses section on the Notifications page.
-
Click the
 Exclude icon beside each course you want to exclude, or click Exclude All Courses to stop all course notifications. You can also use the Search field to find the course you want to exclude.
- Click Close.
- Click Save.
Restore excluded course notifications
- Click the Manage my course exclusions link in the Exclude Some Courses section on the Notifications page.
-
Click the
 Restart notifications icon beside each course you want to receive notifications from, or click Restore excluded courses to restore all excluded courses. You can also use the Search field to find the course you want to restore.
- Click Close.
- Click Save.
Audience:
- Learner [12]