Calendar
Use the Calendar tool to arrange and visualize course events in multiple views and enable integration of course content and your Calendar. You can use iCal to synchronize the Calendar tool to your personal calendars (such as Outlook and Google Calendar, as well as iPhone, Android, and Blackberry).
Learner help topics
Once you are enrolled in a course, its events are automatically added to your Calendar tool. To see course events when you use the Calendar tool for the first time, select the course from the calendar menu. This will "activate" the course calendar and show its availability events.
What are the basics of Calendar?
- Accessing Calendar [1]
- Calendar interface overview [2]
- Changing calendar colors [3]
- Printing calendars [4]
- Adding calendars to your display [5]
- Removing a calendar from your display [6]
- Setting your active course calendar [7]
- Types of calendar events [8]
- Viewing a course schedule in Calendar [9]
How do I create and use Calendar tasks?
- Creating tasks [10]
- Adding task details [11]
- Marking tasks complete [12]
- Viewing completed tasks [13]
- Adjusting upcoming tasks default durations [14]
- Deleting tasks [15]
How do I create and use Calendar events?
- Creating events in Calendar [16]
- Adding a custom location to an event in Calendar [17]
- Adding event recurrences and restrictions in Calendar [18]
- Changing the default event duration [19]
- Displaying events by day, week, or month [20]
- Displaying events in Agenda view [21]
- Displaying events in List view [22]
- Viewing event details in Calendar [23]
- Deleting an event in Calendar [24]
How do I use iCal feeds and files?
- iCal feeds [25]
- Subscribing to an iCal feed [26]
- Exporting an iCal file [27]
- Importing iCal files [28]
Audience:
- Learner [29]
Calendar basics
Audience:
- Learner [29]
Accessing Calendar
Do one of the following:
-
Click
 Calendar on the navbar.
-
Click Go to Calendar from the Calendar widget action menu.
Audience:
- Learner [29]
Calendar interface overview
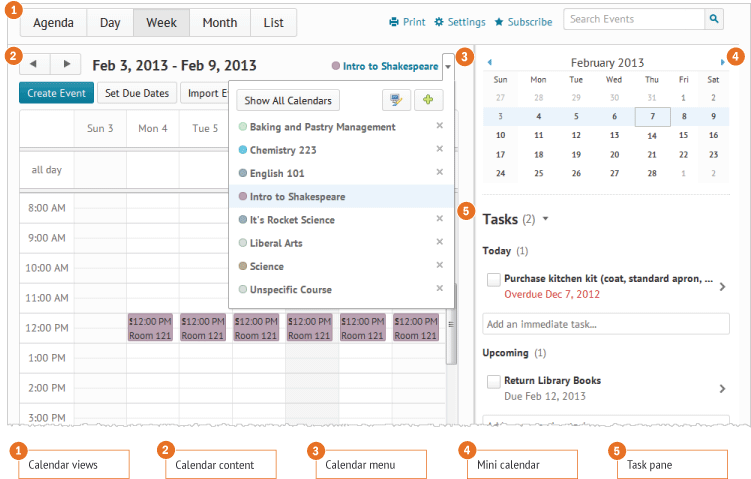
Calendar user interface
Use the calendar views area to toggle between different display layouts for events in the calendar content area. Use the Agenda view to group your course events by Date, Course, or Category - events display in chronological order, and all-day events display at the top of each grouped listing. Use the Day, Week, and Month views to group your events in daily, weekly, or monthly increments. Use the List view to filter your events by Dropbox, Checklists, Discussions, Grades, Materials, Modules, Quizzes, and Surveys. Finally, you can ![]() Print, adjust your calendar
Print, adjust your calendar ![]() Settings, or
Settings, or ![]() Browse through your calendars.
Browse through your calendars.
Use the calendar menu to select multiple calendars to display, change the color scheme associated with individual calendars, and add new calendars.
Use the mini calendar to navigate quickly to a specific day, week, or month. To view a specific day in detail, click the Day calendar view, then click on the day you wish to view in detail in the mini calendar. Your calendar content will load to the day selected in the mini calendar. To view a specific week in detail, click the Week calendar view, then click on any day in the week you wish to view in detail in the mini calendar. To view a specific month in detail, click the Month calendar view, then click on any day in that month you wish to view in detail in the mini calendar. To browse through the mini calendar's months, click the ![]() Show [Previous Month] and
Show [Previous Month] and ![]() Show [Next Month] icons.
Show [Next Month] icons.
Use the task pane to create, track, and maintain personal tasks.
Audience:
- Learner [29]
Changing calendar colors
-
Click the
 Change Calendar Colors icon from the calendar menu area.
- Select the course you want to change the color for from the drop-down list in Calendar Colors. Click the desired calendar color. Lighten or darken the color by moving the arrow on the side of the color bar up and down.
- Click Done.
Note To help you meet visual accessibility standards, there is a built-in WCAG (Web Content Accessibility Guideline) checker on the color selection page. Be aware that if you choose a shade that does not meet these guidelines (for example, the contrast between the text color and the background color is too low), the ![]() check mark by WCAG AA will be replaced by a
check mark by WCAG AA will be replaced by a ![]() warning or
warning or ![]() error icon to alert you to possible accessibility issues. See Customizing colors [30] for more information.
error icon to alert you to possible accessibility issues. See Customizing colors [30] for more information.
Audience:
- Learner [29]
Printing calendars
You can print a daily, weekly, or monthly calendar from the calendar views area, as well as an agenda or list view of your calendar. Click ![]() Print and select your Print Options.
Print and select your Print Options.
Audience:
- Learner [29]
Adding calendars to your display
-
Click the calendar menu, then click the
 Add Calendar icon.
- On the Add Calendars page, select the calendars that you want to display in the calendar content area.
- Click Add.
Each course is assigned its own identifying color by default. To change the default colors, see Changing calendar colors [3].
See also
Audience:
- Learner [29]
Removing a calendar from your display
Click the ![]() Remove Calendar icon beside the course you want to remove from the calendar menu area.
Remove Calendar icon beside the course you want to remove from the calendar menu area.
Audience:
- Learner [29]
Setting your active course calendar
You can switch your current org unit by changing your active course calendar. Select a course from the calendar menu to activate it.
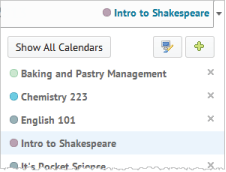
Active calendars in the calendar menu
Note Even when you set your current calendar, the calendar content area will, by default, show events from all the courses listed in the calendar menu. To filter the view, click the ![]() Remove Calendar icon by the course's name you wish to remove from view in the calendar menu.
Remove Calendar icon by the course's name you wish to remove from view in the calendar menu.
Set your active course calendar
Click on a course name from the calendar menu.
Audience:
- Learner [29]
Types of calendar events
There are two different types of events in the Calendar tool:
-
Availability events
Availability events indicate the availability and due dates of course objects in the Calendar tool, but do not have to be created using the Calendar tool. Once you are enrolled in a course, all objects for that course that you enable to display in the calendar will be visible. You can set due dates for course objects, edit, and delete availability events directly from the Calendar tool.
-
General (Content) events
These are events you create within the Calendar tool.
Audience:
- Learner [29]
Viewing a course schedule in Calendar
- Select a course from the calendar menu.
- You will see the course name display as the menu name. Click on it to view that course's schedule.
Audience:
- Learner [29]
Calendar tasks
Audience:
- Learner [29]
Adding task details
- Click the task name to show task details.
-
If your task does not have a due date, click directly on the No due date text to bring up a date selector field, then select a due date, and click the
 Save due date icon.
- Click on the Add a note... field to add explanatory notes to your task. Click outside the text field to save your note.
Audience:
- Learner [29]
Marking tasks complete
Mark a task complete
Select the check box beside the task name in the task pane. The task disappears from view, but remains in your searchable task archive.
Marking all tasks complete
Select ![]() Set all Complete from the Tasks context menu.
Set all Complete from the Tasks context menu.
Note Tasks will only disappear when you mark them complete if you select Hide completed tasks in the drop-down list under Completed Tasks in ![]() Settings.
Settings.
Audience:
- Learner [29]
Viewing completed tasks
You can bring up a list of completed tasks by clicking View Completed Tasks in the task pane. However, you can choose to display completed tasks for a certain period of time in the task pane before they are hidden.
Display or hide completed tasks
-
Click
 Settings in the calendar views area.
- Under Completed Tasks, select your preferred setting for completed tasks using the drop-down list.
Audience:
- Learner [29]
Adjusting upcoming tasks default durations
-
Click Settings in the calendar views area.
- In the Tasks Options section, select your preferred Upcoming Tasks Default Durations using the drop-down list.
Audience:
- Learner [29]
Deleting tasks
| To | Do this |
|---|---|
| Delete one task |
|
| Delete multiple tasks |
|
Audience:
- Learner [29]
Calendar events
Audience:
- Learner [29]
Creating events in Calendar
Note As a student, you can only create Calendar events for your group.
Create a general (content) event
- Using the calendar menu, select the course for which you want to create the event.
- Click Create Event in the calendar content area.
-
Click
 Add Content on the Create Event page to associate course content with the event. Select the radio button of the content you want to add to the event and click Add.
- Enter a Title, Description, and specify a date and time. If you add content and want to add a custom name for the event, select Use custom name and enter the custom title.
- Click Create.
You can also create events directly in the day, week, and month Calendar views by clicking a time or date.
Optional information:
- Enter information about recurrences and restrictions. See Adding event recurrences and restrictions in Calendar [18] for more information.
- When entering a Description, you can use the HTML Editor to insert tables, quicklinks, images, and you can also include resources available through the Insert Stuff option.
- Enter a Location. If you choose to add a custom location, you can enter a URL as a location.
- Add Presenters. See Adding a presenter to an event in Calendar [31] for more information.
Note To add and remove content to an event after you have already created it, click the context menu for the event name in agenda view, then click ![]() Edit Event, or click the event in the calendar content are, then click Edit.
Edit Event, or click the event in the calendar content are, then click Edit.
"Quick create" an event
- In the calendar menu, click on a course to set it as the current calendar.
- In Day view, click a time interval to create an event within that course.
- Enter a Title and select Attendees if applicable.
See also
Audience:
- Learner [29]
Adding a custom location to an event in Calendar
Inside the event you want to add a location and seating chart to, select Custom from the Location drop-down list. Enter the location in the text box.
Audience:
- Learner [29]
Adding event recurrences and restrictions in Calendar
| To | Do this |
|---|---|
|
Add an event recurrence |
|
|
Add an event restriction |
|
Audience:
- Learner [29]
Changing the default event duration
-
Click Settings in the calendar views area.
- In the Default Event Duration drop-down list, make your time selection. Click Save.
Audience:
- Learner [29]
Displaying events by day, week, or month
Click between the Day, Week, and Month buttons to toggle the way the calendar displays events.
Change core hours
-
Click Settings in the calendar views area.
- Set your core hours. Click Save.
Note It is more important to set core hours if you are viewing your calendar on a smaller resolution screen. Core hours determine the minimum height of the day and week view, and the shaded areas of the calendar.
Hide or show weekends
-
Click Settings in the calendar views area
- Under Core Hours on the Settings page, clear or select the check box next to Show weekends to hide or show weekends. Click Save.
Audience:
- Learner [29]
Displaying events in Agenda view
View as an agenda
To display calendar content in the Agenda view, click Agenda in the calendar views area.
Change event grouping
You can change how events in the agenda are grouped using the Date, Course, and Category options in the calendar content area.
Change time range
To change the time range of the list of events in the Agenda view, toggle the ![]() left- and
left- and ![]() right-facing arrows. Your choices are:
right-facing arrows. Your choices are:
- Today and tomorrow
- Next 7 days
- Next 14 days.
Audience:
- Learner [29]
Displaying events in List view
In the List view, you can see all your course events in a list. You can also filter them by type: Dropbox, Checklists, Discussions, Grades, Materials, Modules, Quizzes, and Surveys.
Audience:
- Learner [29]
Viewing event details in Calendar
Do one of the following:
- Click on the event in the day, week, or month view to access a partial display of event details.
-
- Click More… to see full event details in these views, including any content available for viewing.
- Click the event in the List view to access full event details.
Audience:
- Learner [29]
Deleting an event in Calendar
Do one of the following:
-
In the Agenda view, click the context menu for the event name and select
 Delete Event.
- In the Day, Week, and Month view, click the event, and Delete.
-
In the List view, click the event. Select Delete Event from the context menu of the event.
-
Note You can only delete events created in the Calendar tool.
Audience:
- Learner [29]
Understanding iCal feeds and files
Audience:
- Learner [29]
iCal feeds
Use iCal feeds to access your Calendar events outside of the learning tool. With iCal feeds, you can view your course events in external calendars such as Microsoft Outlook® and Google Calendar®, and mobile devices such as iPhones, Blackberries, and Android phones.
Enable iCal feeds
-
Click Settings in the calendar views area.
- Select Enable Calendar Feeds.
Audience:
- Learner [29]
Subscribing to an iCal feed
Subscribing to iCal feeds syncs your external calendar application or device with the Learning Suite Calendar tool, keeping you updated without necessarily logging in to Learning Environment.
Subscribe to an iCal feed
| To | Do this |
|---|---|
| Subscribe to all calendars (including your Tasks) |
|
| Subscribe to one calendar |
|
| Subscribe to your Tasks |
|
Note Refer to your device or application instructions for adding an iCal feed, as each application can have a different method for managing iCal feeds.
Audience:
- Learner [29]
Exporting an iCal file
Exporting iCal files allows you to export your calendar events as static events into external calendar tools such as Google Calendar® or Microsoft Outlook®. Your external calendar will not reflect changes subsequently made to your Learning Suite calendar.
Export iCal files
| To | Do this |
|---|---|
| Export all Calendars and Tasks |
|
| Export one Calendar |
|
| Export tasks |
|
Audience:
- Learner [29]
Importing iCal files
You can add new events and update existing events by importing them from an external iCal file into your Calendar.
Import events from an iCal file
- Select the course you want your events to be grouped under by clicking on it from the calendar menu.
- Click Import Events.
- Click Browse on the Import Events page to search for the iCal file containing your events. If you want to import the events into a specific group or section, select it in the Attendees drop-down list.
- Click Open, then click Import.
Audience:
- Learner [29]